HOW TO BUILD A SNOWMAN
I thought I would share a tutorial on how to build a simple snowman out of wood and other simple materials.
Materials needed; 1- 4x4 post, not pressure treated. I got mine at Home Depot for around $8-$10 ( I can't remember for sure as I bought this one about 6 months ago for another project). It comes in 8 ft. lengths and you have to cut it down to size.
I cut the main body in a 9.5" length
The hat consists of a 1"x6" pine board cut 5.25".
The top of the hat is another piece of the 4x4 cut to 2 inches.
This is how it is stacked. But first paint the main body of the snowman with white paint. I used Apple Barrel, white 20403E. The bill and the top are painted black using Apple Barrel black 20404E.
Here are the extra supplies needed:
A piece of fabric (cotton works well) cut 3"x 25" folded in half lengthwise for the scarf. I tore the fabric rather than cutting for a rustic and frayed look.
Fabric, sprig of greenery, a bunch of mini pine cones and a calligraphy pen to draw the face. You could use a Sharpie to draw the face on the snowman too
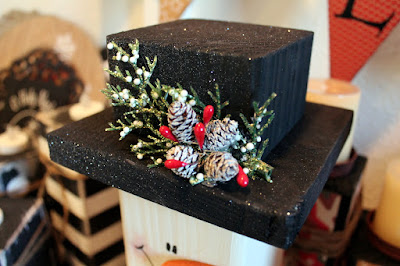
I hot glued the hat decorations on the bill.
The nose is something I cut using my scroll saw. You could also paint a cute nose right on the face using orange paint. I usually draw the face with a pencil first so I get it just right.
A quick spray of Glitter Blast is the finishing touch.
Oh ya, some mismatched buttons are glued down the front also.
THIS PARTICULAR SNOWMAN IS PART OF THE INVENTORY I HAVE BEEN WORKING ON FOR MY ANNUAL BAZAAR.


1 comment:
Oh my Gosh Connie, he is so stinking cute and by the looks of it, not so difficult to do. Thanks for the tutorial your snowman is absolutely adorable and ready for snow! How exciting for you to prepare for a bazaar, those are always fun to go to. You should do one in Yakima, you could stay at our house!!
Post a Comment